Quick Start
Windows:
mkdir django-blog-app && cd django-blog-app
git clone git@github.com:SamuliNatri/django-blog-app-tutorial.git .
setup.bat
venv\Scripts\activate.bat
python manage.py runserver
macOS, Linux:
mkdir django-blog-app && cd django-blog-app
git clone git@github.com:SamuliNatri/django-blog-app-tutorial.git .
chmod 700 setup.sh
./setup.sh
source venv/bin/activate
python manage.py runserver
Visit these URLs:
- http://127.0.0.1:8000/admin (username && password == admin)
- http://127.0.0.1:8000/blog/how-to-make-money/
Step-By-Step Tutorial
New Project
Use this to setup a new project:
Django - Project Setup Tutorial (Python)
Blog App
Create a new app:
python manage.py startapp blog
An app is a self-contained unit that encapsulates specific functionality, such as a blog system.
Settings
Edit mysite/settings.py and make these changes:
INSTALLED_APPS = [
    'django.contrib.admin',
    'django.contrib.auth',
    'django.contrib.contenttypes',
    'django.contrib.sessions',
    'django.contrib.messages',
    'django.contrib.staticfiles',
    'blog', # here
]

TEMPLATES = [
    {
        'BACKEND': 'django.template.backen...',
        'DIRS': [BASE_DIR / 'templates'], # here
        'APP_DIRS': True,
        # ..
    },
]
The preferred method, according to the official documentation, for adding a new app is to explicitly provide a dotted path to its configuration class:
INSTALLED_APPS = [
    'blog.apps.PagesConfig', # here
    'django.contrib.admin',
    'django.contrib.auth',
    # ...
]
However, in real life, you often encounter this kind of structure:
INSTALLED_APPS = [
    # default
    'django.contrib.sites',
    # third-party
    'rest_framework',
    # local
    'blog',
]
This is how I do it; I simply add my apps at the bottom of the list.
Note: Third-party packages might have their own preferences regarding the order.
INSTALLED_APPS order
The order of the list matters; apps at the top take precedence. Source: https://docs.djangoproject.com/en/dev/ref/settings/#installed-apps
For example, let's consider two apps: Blog and Forum, both of which provide a profile.html template (located in blog/templates/profile.html and forum/templates/profile.html). The app that is listed first provides the template when you reference it: return render(request, 'profile.html', {}).
On the other hand, typically, you would place the template in a subfolder like this: blog/templates/blog/profile.html and reference it as blog/profile.html.
DIRS setting
By specifying the 'DIRS': [BASE_DIR / 'templates'] setting, we enable Django to locate templates in the project root templates folder, allowing us to centralize all templates in one place.
Instead of this...
blog/templates/blog/profile.html
forum/templates/forum/profile.html
...we can do this:
templates/blog/profile.html
templates/forum/profile.html
Post Model
Edit blog/models.py and create the following model:
from django.db import models
from django.urls import reverse


class Post(models.Model):
    title = models.CharField(max_length=255, blank=False, default='')
    body = models.TextField(blank=False, default='')
    slug = models.SlugField(max_length=255, blank=False, unique=True)

    def __str__(self):
        return self.title

    def get_absolute_url(self):
        return reverse('blog:post_detail', args=[self.slug])
Use CharField to store text when you know its maximum length.
blank=False requires the user to fill in the field.
default='' sets a default value for a field. This is particularly useful when adding a new field to a model with existing database entries because it specifies the value for those existing items.
Use TextField when you anticipate lengthy text entries.
slug is a short label that we use for blog URLs, for example, how-to-make-money.
unique=True requires the field value to be unique. We don't want multiple blog posts to have identical URLs.
Null values
While null=True is available, it introduces three potential states: null, an empty string, and a non-empty string. I prefer just the last two to keep things simple.
Human-readable representation
The __str__ method should yield a human-readable representation of an object. This returned value is used in various contexts, including the admin interface and templates.
Absolute URL
get_absolute_url is used to generate an absolute URL for an object, making it easier to link to them.
For example, you can create a link to the object like this:
<a href="{{ post.get_absolute_url }}">{{ post.title }}</a>
This also adds a convenient VIEW ON SITE link to the admin edit page.
Migrate
Run migrations:
python manage.py makemigrations
python manage.py migrate
Database migrations are a way to manage changes to your database schema over time.
makemigrations generates migration files from models. This command is typically only run in the development environment.
migrate applies those migrations to update the database. This command is used in both the development and production environments.
You should now have a new database (db.sqlite3) in the site root with a table for the Post model.
View
Edit blog/views.py and create a view for blog posts:
from django.views.generic import DetailView
from blog.models import Post


class PostDetailView(DetailView):
    model = Post
DetailView is a class-based view that's used to display the details of a single object.
Template
Create templates/blog/post_detail.html:
<div class="post">
    <h1>{{ post.title }}</h1>
    <div class="body">{{ post.body }}</div>
</div>
PostDetailView uses the post_detail.html template automatically, without us needing to specify it.
We could simply use <h1>{{ post }}</h1> because the __str__ method in the Post model already returns the title. This is one of the places the human-readable representation is used.
URLs
Edit mysite/urls.py and add these lines to the project urls.py file:
from django.contrib import admin
from django.urls import path
from blog.views import PostDetailView # here

urlpatterns = [
    # add this path:
    path('blog/<slug:slug>/', PostDetailView.as_view(), name='post_detail'),
    path('admin/', admin.site.urls),
]
urlpatterns map URLs to views, passing any captured parameters from the URL to the view.
In <slug:slug>, the first 'slug' indicates that we are capturing a slug, and the second 'slug' is the name of the parameter that we pass to the view
name='post_detail' assigns a name to the URL pattern, enabling you to generate URLs based on their names in templates or views.
Including URLs
In this case, we manage all URLs in the main urls.py file, allowing you to see all endpoints for your apps in one place. However, you could create a separate urls.py file for each app.
Create blog/urls.py:
from django.urls import path
from blog.views import PostDetailView

app_name = 'blog'

urlpatterns = [
    path('<slug:slug>/', PostDetailView.as_view(), name='post_detail'),
]
app_name = 'blog' namespaces the URLs. This allows you to target specific apps using namespaced patterns like blog:post_detail.
Include it in the main urls.py file:
from django.contrib import admin
from django.urls import include, path # import include


urlpatterns = [
    path('blog/', include('blog.urls')), # here
    path('admin/', admin.site.urls),
]
Admin
Edit blog/admin.py and register the Post model so that we can add content using the admin app:
from django.contrib import admin
from . import models


admin.site.register(models.Post)
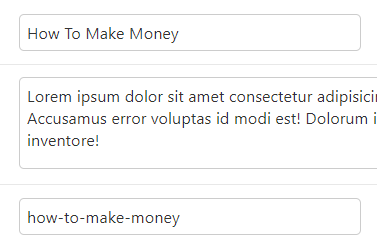
Content
Visit /admin/ to create a new blog post:
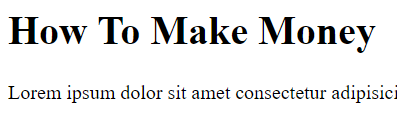
Result
Visit /blog/how-to-make-money/ to see the post:
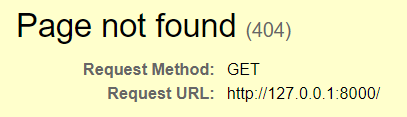
Note that you will see this on the front page because we don't have a URL / view for it: